Shopping List:
4x 400g Sainsbury’s Milk Chocolate @ £1.54 each
4x packs Sainsbury’s Raspberry & Cream Marshmallows @ £0.99 each
1x pack Walnuts @ £0.69
1x 3pack Vanilla Walnut Whip @ £0.98 (for inspiration)
1x plastic bowl @ £0.40p
1x plastic spatula @ £0.20p
Introduction:
This pimp had originally been planned to be a re-creating of a McVities Gold Bar but since Sainsbury’s did not have any multpacks of Caramacs with which to make the outer layer that plan was abandoned. Not being one to give up so easily in the face of defeat I scanned the shelves of the confectionery aisle looking for inspiration, then my eye fell upon the classic confection loved by thousands if not millions… the walnut whip! It’s a sweet I’d not eaten for quite a few years but certainly one that I’d enjoyed eating in the past so with my mind focussed on my new goal I set off to gather the ingredients.
Note: due to an unfortunate malfunction with the micro drive in my camera the shots from the first half of the process were lost so I’ve tried my best to recreate what steps I could to show the various stages of construction but some are missing, sorry.
The blueprint:

Step 1. building the shell
Looking at the construction of a walnut whip its basic parts are made up of a top dome shape, a thick chocolate base and a creamy fondant centre. Deciding my best plan of action was to start from the outside and work may way in and then add the base on at the end I got to work on the main shell.
The mould for the shell is a 40p plastic bowl I found on sale in the Sainsbury’s cookware department (bargain!). So I got a glass microwave proof bowl and set about melting the chocolate.
Top Tip: when melting chocolate you don’t want to over heat it. Break it into lots of tiny chunks and put it in the microwave on full power for about 30 seconds, take it out give it a stir and then repeat once or twice more. By this time there should still be a couple of lumpy bits but it you keep stirring the heat of the surrounding chocolate will melt it soon enough.
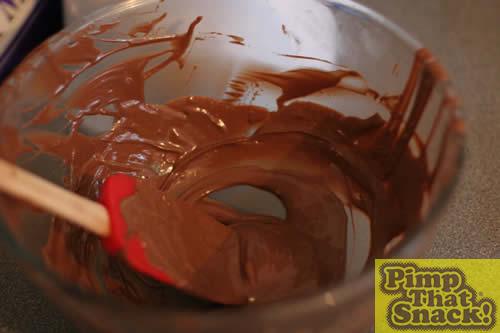
To make sure that the walls of the shell were thick enough I did this part in stages using 200g of chocolate at a time. The first time I spread it around the inside of the bowl as best I could and let most of it settle at the bottom to give the top of the shell enough thickness to support the walnuts at the end. I then added 3 more lots of chocolate (800g or two bars in total) but this time letting it sit in the fridge for a couple of minutes and when it stiffened a little using a spatula (another Sainsbury’s bargain @ 20p) to push the chocolate up and around the sides of the bowl, I did this until the whole thing was about 1cm thick and then I left it in the fridge to cool.
Step 2. the filling.
When picking the ingredients these were the most frustrating. I knew the original whip had a fondant centre but I had no idea how to make fondant and I figured marshmallow was just as good. Except I had one small problem, in the whole of the Sainsbury’s supermarket the only marshmallows I could find were expensive Raspberry and Cream flavoured ones. By this time I’d been in the supermarket for about half an hour and was getting fed up so I had to settle for these.
To get them into a pliable form to start filling my pimped out walnut whip I put them in a bowl a bag at a time and micro waved them for roughly 30 seconds on full power, they still looked solid when I took them out but as soon as I stirred them with the spatula they turned to mush and made a huge sticky mess. I then took the melted goo and spooned it into my upturned hollow chocolate shell. As luck would have it 4 packs was the precise number need to fill the bowl I was using up to the brim almost. I put the whole thing back into the fridge for half an hour to firm up so I could then move onto the base lid.
[Sadly this was the main part where my camera memory card packed in and no pictures of this bit can be seen (you’ll see the filling at the end though so fear not).]
Step 3. the base.
This part was easy. I took another of the 400g bars of chocolate and melted the whole thing in the microwave, I then simply poured it over the top of the mallow filling and smoothed it out making sure it was flat and reached the edge of the bowl all the way around.
The whole thing was left in the fridge overnight to set.

Step 4. decoration.
Luckily removing the pimped out walnut whip from the bowl proved to be extremely easy and came out with just a couple of taps on the bottom of the bowl. The one drawback being that the bowl has made the outside completely smooth which is not the walnut whip way.

Now some people might have just stopped at this point and moved onto the walnut topping anyways. But being a perfectionist I couldn’t be pleased with my pimping until it shared the same rough exterior as the real deal. I melted the last bar of chocolate and using a spatula spread ¾ of it all over the outside of the shell. I then tried to draw rough lines in the extra chocolate layer. Then back in the fridge it went to set.

Step 5. the piece de resistance.
No walnut whip could ever be called as such without its crowning glory, the Walnut (the clue is in the name people). But on a pimped out snack like this a single walnut just wasn’t going to cut the mustard. I took the last ¼ of the melted chocolate I had saved from the final bar and placed a small circle of chocolate on a small side plate, I then took my packet of walnuts and using chocolate as a binding agent made a large mound of nuts. This went in the fridge to set as well.

Once both parts were set I then took the walnut lump and using the very last bit of chocolate as glue stuck it atop the summit of mount walnut whip. Again back into the fridge for a bit.
Finally it was ready, after nearly 3 hours of toil (not counting the waiting parts) it was done. I had successfully pimped my snack. I tasted success and it was sweet.
Side by side size comparison:

Cross section:


Comments